Are you interested in improving your Windows 11 PC’s performance? If so, then we’ll help you with some tips and tricks to boost its speed and efficiency. One of the most effective methods is to disable startup programs, which can significantly reduce boot time and ensure a seamless experience upon login.
However, knowing the location of the Windows 11 startup folder is important if you want to add your preferred applications to the startup app list. Fortunately, our comprehensive guide can help! We’ll show you exactly where to locate the startup folder in Windows 11 and how to add shortcuts for your preferred programs.
By carefully following the step-by-step instructions, you can effectively enhance the speed and efficiency of your computer, leading to a more seamless and dependable user experience. Continue reading to gain further insights and information.
Table of Contents
Why You Should Monitor Startup In Windows 11
A thorough examination of the programs, services, and scripts that load during Windows 11 startup can be beneficial for multiple reasons.
One significant advantage of startup is that it provides a convenient and time-saving way to launch commonly used applications such as email clients or collaboration tools automatically. However, for systems that are experiencing performance issues, excessive programs and scripts can strain system resources, leading to decreased performance. Thus, it is recommended to regularly inspect and exclude unnecessary components from the Windows 11 startup.
In addition to performance issues, it is also important to consider security concerns. Certain malware takes advantage of the Autostart feature to load at every system startup, potentially causing harm to your system. Regularly reviewing the components of the startup folder can help prevent these security threats.
Overall, understanding the components of the Windows 11 startup and taking necessary precautions to manage it can help optimize system performance and enhance system security.
How To Find The Windows 11 Startup Folder
Using Run Command
To locate the Windows 11 Startup folder quickly and easily, you can utilize the Run dialog box. By running a simple command, you can easily access the Startup folder in just a few seconds.
- To access the Startup folder on your Windows 11 PC, begin by using the keyboard shortcut “Windows + R” to open the Run prompt. Once it appears, type in the command provided below and then press Enter.
- Following this step will open the Startup folder on your Windows 11 computer. You can then proceed to add or remove shortcuts according to your preferences.
- Additionally, you can use the path provided below and paste it into the Run prompt to directly access the Startup folder on your Windows 11 device.
| %appdata%\Microsoft\Windows\Start Menu\Programs\Startup |
From The File Explorer
To locate the startup folder in Windows 11, you can easily use File Explorer. Simply follow these steps:
- To open File Explorer on your Windows 11 PC, simply press the “Windows + E” keys simultaneously on your keyboard.
- Click the “Options” button on the “View” tab of the ribbon menu.
- In the “View” tab, select the “Show hidden files, folders, and drives” option under “Hidden files and folders”. Then, click “Apply” and “OK”.
- Click on the address bar’s downward arrow and open your user profile, which typically bears your PC name or username.
- Look for the “AppData” folder, which may appear translucent because it is hidden from general users.
- Navigate to Microsoft -> Windows -> Start Menu -> Programs to find the “Startup” folder.
- The “Startup” folder contains shortcuts to all the programs on your Windows 11 startup apps list.
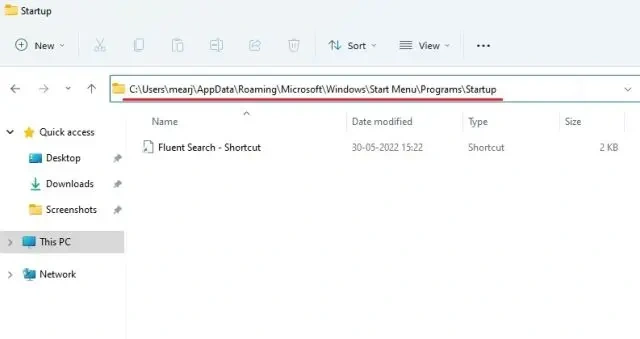
- To summarize, the location of the Windows 11 Startup folder is as follows (replace “username” with your PC’s username):
| C:\Users\username\AppData\Roaming\Microsoft\Windows\Start Menu\Programs\Startup |
Folder For All Users
Please note that the two approaches described earlier are only helpful in finding the Startup folder for your existing profile. If, however, an application installs a program that is meant to be used by all users, then the shortcuts are saved in a distinct location for the Startup folder.
- To launch the Run prompt in Windows, simultaneously press the “Windows + R” keyboard keys. Then, enter the appropriate command in the prompted field and hit the Enter key to execute it.
| shell:common startup |
- By following the above command, the Startup folder for all users will instantly open on your Windows 11 computer.
- Another way to access the Startup folder in Windows 11 is to copy and paste the following path into the Run prompt:
| %ProgramData%\Microsoft\Windows\Start Menu\Programs\StartUp |
- To summarize, this is the location of the Startup folder on Windows 11 that is meant to be used by all users.
| C:\ProgramData\Microsoft\Windows\Start Menu\Programs\StartUp |
How To Exclude Programs From Windows 11 Startup
Unwanted applications that start up automatically after login can slow down your system and cause unnecessary interruptions. Fortunately, there are various ways to exclude such applications from Windows 11 startup.
One method involves changing the settings within the application itself. Locate the auto-start or auto-launch setting and disable it. Alternatively, you can remove the application’s shortcut from the startup folder(s).
It’s important to note that you must have administrator rights to delete entries in the general startup folder and exclude programs from startup in Windows 11.
Another approach is to disable program startup via the Task Manager. Access the Task Manager by using the key combination [Ctrl] + [Shift] + [Esc], and then switch to the “Startup” tab. Here, you can select the application you wish to prevent from auto-starting and disable it by right-clicking on it.
By taking control of which applications start up automatically, you can optimize your system’s performance and minimize disruptions.


